This was actually a requested post from a reader by the name of Green. Thank you for your email and I hope this helps! *^*
If anyone has any questions, feel free to email me~
•∞•∞•∞•∞•∞•∞•∞•∞•∞•∞•∞•∞•∞•∞•∞•∞•∞•∞•∞•∞•∞•∞•∞•
Hi guys! Today's tutorial is for beginner make up users or people who have trouble doing their eyeliner/mascara. If you aren't, I hope you find my tips helpful in someway or another~
First off, what eyeliner should I use?


Hi guys! Today's tutorial is for beginner make up users or people who have trouble doing their eyeliner/mascara. If you aren't, I hope you find my tips helpful in someway or another~
First off, what eyeliner should I use?

Never use random and super cheap brands for eyeliners. You will have a super hard time with application because of the consistency. Not to mention, risks for eye allergies. :< (first hand experience)
Two good brands to start out with are NYX and e.l.f. Super affordable, but also high in quality. Today we'll be using NYX's Retractable Eyeliner and Liquid Liner.
Retractable Eyeliners/Regular Eyeliners
In my opinion, is the best thing to start out with. Smudges aren't usually noticeable, giving room for mistakes!
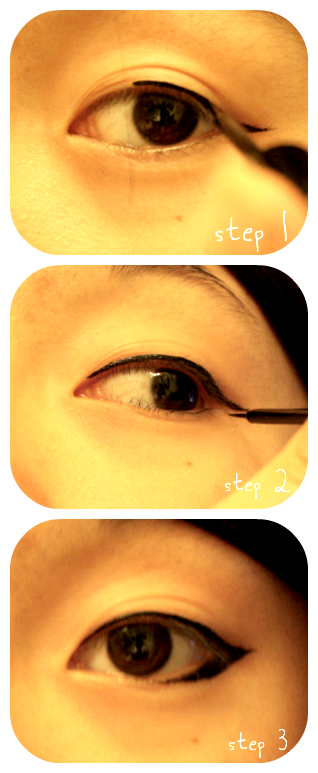
Step 1:
Hold your eyelid taunt as you start drawing from the middle of eye. Draw outwards first, stopping at where your eyes meet. Then finish the line.
Step 2:
Release your hold and stare straight. Draw and extended line not too far from your eyes. Be fancy and wing it if you'd like!
Step 3:
Determine where you want your bottom line to end. I usually end it 1/2 of the way in. Try to line it as close to the water line as possible.
Step 4:
Draw the outline on the bottom and fill it in! Smudge that line into the direction of the tear duct and retouch any other parts you aren't satisfied with.
Finished!
Liquid Liners
A little harder to control. They're easily smudge-able when wet and requires a very steady hand. The brush is usually thin, allowing you to create thin, edgy lines.
Step 1:
Again, start from the center so you have an idea of how thick you want your line to be. Then go back to redraw the first half. Avoid using too much at a time as it could get into your eyes! Rest your hand on your cheek, drawing as close as you can to the to the waterline.
Step 2:
Estimate what angle and thickness you want you bottom line to be. Connect an outline from the outer part of the top line to where you want it to stop. Creating a steadily thinning line will give the illusion of naturalism.
Step 3:
Fill in the outline and retouch areas you think are lacking. Let everything dry before adding anything else.
Finished!
Mascara

Grab your favorite mascara and an index card! I'll be using the mini version of Benefit's They're Real! Mascara. I got it as a birthday gift from Sephora~
Step 1:
Ok, first off I like to say I completely screwed up the picture for this. LOL
What you're supposed to do is put the index card behind your lashes and brush up. This prevents excess mascara and getting on your eyelids.
Step 2:
Do the same for your bottom lashes. Be sure not to put too much on them or they will smudge under your eyes when blinking.
Step 3:
Put your index card in front of your top lashes and blink around twenty times. This helps separate your lashes and make them seems more natural. Great way to get rid of clumping.
Step 4:
Really isn't a step, just showing how much excess there was on my lashes.
Finished!
•∞•∞•∞•∞•∞•∞•∞•∞•∞•∞•∞•∞•∞•∞•∞•∞•∞•∞•∞•∞•∞•∞•∞•
After finishing, your eyes should seem larger and more awake! Hopefully you didn't smudge anything. If you did, just try again~ Eyeliner takes practice and patience. Once you start using it enough, it should just be an everyday thing for you. *A*
I'd also like to excuse my acne. :'< I didn't use any face make up in fear that it would make it worse.
But all that aside, here's the finished look!

Thank you so much for reading and I hope you found this helpful! ❤
☆ gin ★
∞•∞•∞•∞•∞•∞•∞•∞•∞•∞•∞•∞•∞•∞•∞•∞•∞•∞•∞•∞•∞•∞•∞•∞
If you happen to follow me or like my posts, comment below and link your blog! I'll be sure to check it out. ★
∞•∞•∞•∞•∞•∞•∞•∞•∞•∞•∞•∞•∞•∞•∞•∞•∞•∞•∞•∞•∞•∞•∞•∞
If you happen to follow me or like my posts, comment below and link your blog! I'll be sure to check it out. ★
Nice tutorial <3
ReplyDeletehttp://www.gwiyomistyle.net/
ajfaklsdf Thank you so much for this- it's so helpful! I really appreciate the time you took to do this!
ReplyDeleteI love pencil eyeliner any day over liquid liner. Last time I tried to line my eyes with liquid, I stabbed myself a million times until I looked like I had been crying - my eyes were are red and horrible asdfghjkl. Good post though! Love the mascara card trick!
ReplyDeleteI'd love it if you could check out my blog! x
michelleytan.blogspot.co.nz
No problem! It was my pleasure~ *A* Thank you so much for asking!
ReplyDeleteIt's all in the flick of the wrist!
ReplyDelete...is what they say-
No man, I totally understand. LOOL Even now I still jab my eyes every now and then. OTL
Thank you so much! <3
I'm looking at your blog right now. Oh my gosh, you're adorable. <3
I'm following now!
Hey, Gin! Nice tutorial you got here. and you're only 14! Wow! I'm starting into make up since I was 20!
ReplyDeleteI think i'm gonna try the liquid liners. it's so hard to use it!
Anyway, thanks for haring this tutorial, dear!
xx, Mira | http://lemieletlavanille.blogspot.com
do come by and give me a follow-back! Cheers!
Nice tutorial Gin!! It takes me forever to apply eyeliner!
ReplyDeleteJustsoapril.blogspot.com
Thank you so much April~! <3
ReplyDeleteIt's takes me no more than 5 minutes now! Whoot whoot fast application~
I'll be sure to check out your bloggy! *^*
No problem! I'm glad it helped. <3
ReplyDeleteThank you for reading! ///v///